 How to Remotely Login to the ONT Web Page?
22 Oct, 2025. Posted by:XPONSHOP
Most Views Posts
How to Configurate Telnet Login for Huawei Switch?
2025-10-22 09:06:36
Huawei S Series Switches Stack Guide—Version and Model Requirements
2025-10-22 09:03:46
How to Configure the INTERNET WAN of Huawei ONT on MA5800-X17?
2025-10-22 09:00:39
Unlocking ME60 NAT- What You Need to Know
2025-10-22 09:07:50
The ONT Configuration Status Fails on Huawei MA5608T
2025-10-22 08:59:33
Popular Posts
The Potential of WDM-PON
2025-10-22 09:02:46
How to Configure the INTERNET WAN of Huawei ONT on MA5800-X17?
2025-10-22 09:00:39
Exploring the Basics of EDFA
2025-10-22 09:05:17
What is the difference between ONU and ONT?
2025-10-22 08:48:38
How to Configure Multicast GPON ONT
2025-10-22 08:41:02
Random Posts
Huawei CurbPON Solution
2025-10-22 09:03:07
GPON ONT OMCI vs TR069 vs U2000 vs XML
2025-10-22 09:02:57
ETP4830-A1 SMU Monitor Module Introduction
2025-10-22 09:00:28
How to Configure Multicast GPON ONT
2025-10-22 08:41:02
Difference between 5G and Wi-Fi 6
2025-10-23 09:07:54
Recent Posts
How to Configure and Manage Rogue ONU Detection on ZTE ZXA10 C3XX
2025-12-03 16:10:43
What are MTU and Jumbo Frame?
2025-12-03 16:01:42
Reasonable Split Ratios for Huawei OLT Service Board i.e. GPFD/GPHF/CGHF/CSHF
2025-11-26 09:03:18
Difference between 5G and Wi-Fi 6
2025-10-23 09:07:54
How to configure Wi-Fi services through the NMS?
2025-10-22 09:11:04
About
XponShop blog describes some basics for Huawei / ZTE /
Nokia / FiberHome GPON OLT, ONT, SFP, and Site Power...
such as configurations, issue troubleshooting, knowledge
sharing, and keeps updating.
Recent posts
Products from the blog


As we know maintenance engineers can perform maintenance and troubleshooting without any site visit by remotely logging in to the Web page.
This blog will guide you on how to remotely log in to the Huawei ONT Web Page.
Prerequisites
1. The Huawei OLT and the NMS can communicate with each other properly.
2. The NMS is able to discover an online ONT and Layer 2 service channels between the OLT and the ONT are enabled.
Impact on the System
Exercise caution when remotely logging in to the Web page because it deteriorates ONT security.
Procedure
1. Configure an ONT general VAS profile.
a. From the main menu, choose Configuration > Access Profile Management. In the navigation tree of the tab page that is displayed, choose PON Profile > ONT VAS Profile.
b. On the General ONT VAS Profile tab page, right-click, and choose Add from the shortcut menu.
c. In the dialog box that is displayed, set Name to ONT.
d. Configure static WAN parameters.
In the navigation tree, choose General Para > WAN Device > WAN Device 1 > WAN Connection. Select WAN Connection, right-click, and choose Add IP Connection from the shortcut menu. Select WAN IP Interface1 and add a static WAN interface.
● Set WAN Enable to Enable.
● Set Connection Type to Routed.
● Set Vlan ID the same as the CVLAN ID of the traffic streams configured on the OLT.
● Set Addressing Type to Static.
Configuring static WAN parameters
e. Click Next.
f. In the dialog box that is displayed, set vendor ID to HWTC, Terminal Type to General Type and Version to V1R003C00-ZZ, click Add.
g. In the dialog box that is displayed, choose General Type Config Info > WAN Device > WAN Device 1 > WAN Connection > WAN Connection 1 > WAN IP Interface > WAN IP Interface 1, set WAN Interface Name to ONT and Service Type to INTERNET.
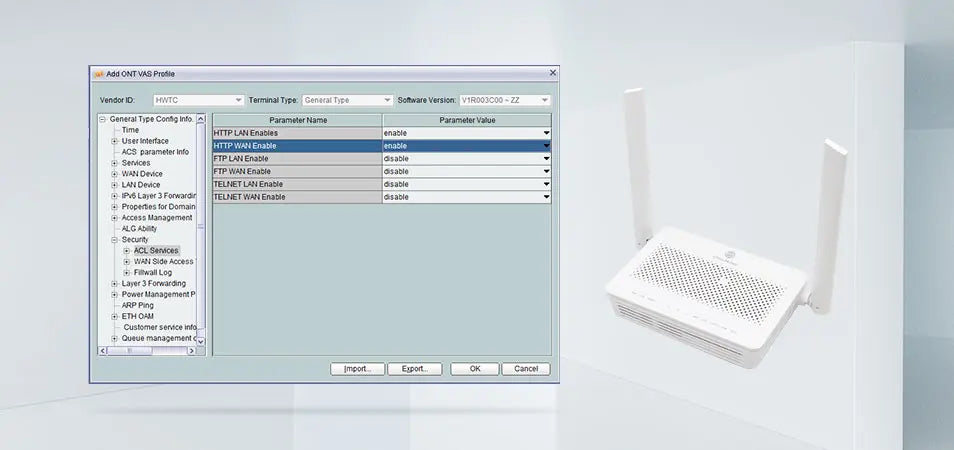
h. Enable the access rights on the WAN.
In the navigation tree, choose General Type Config Info > Security > ACL Services. On the right pane, set HTTP WAN Enables to enable.
Enabling the access rights on the WAN
i. Click OK.
Notice
HTTP, Telnet, and FTP have security risks due to protocol restrictions, and can be used only in a secure environment.
WAN-side HTTP, Telnet, and FTP access rights take effect for only once. The access rights settings are not retained after the ONT is restarted. The system will disable the WAN-side access rights.
2. Bind a general VAS profile.
a. In the Physical Map navigation tree on the Main Topology tab page, double-click the target OLT, or select the target OLT, right-click, and choose NE Explorer.
b. In the navigation tree, choose GPON > GPON Management.
c. In the window on the right, choose GPON ONU.
d. On the GPON ONU tab page, set the search criteria to find the GPON ONU records.
e. Select an ONT from the list, right-click, and choose Value-Added Service > Bind General VAS Profile from the shortcut menu. In the dialog box that is displayed, select the created profile, and click OK to complete profile binding.
3. Configure the ONT VAS.
a. On the GPON ONU tab page, select an ONT, right-click, and choose Value-Added Service > Configure Value-Added Service from the shortcut menu.
b. Click the Basic Parameters tab in the dialog box that is displayed, select WAN Port and set IP Address, Subnet Mask, and Default Gateway.
c. Click OK. The configurations take effect without the requirement of resetting the ONT.
Result
Enter the configured static IP address in the address bar of the Internet Explorer. The login Web page is displayed. Enter the user name and password (the default user name is telecomadmin and the default password is admintelecom). The configuration page is displayed.
If any tech ONT technical questions or project inquiry, please contact our XponShop team by e-mail at sales@xponshop.com